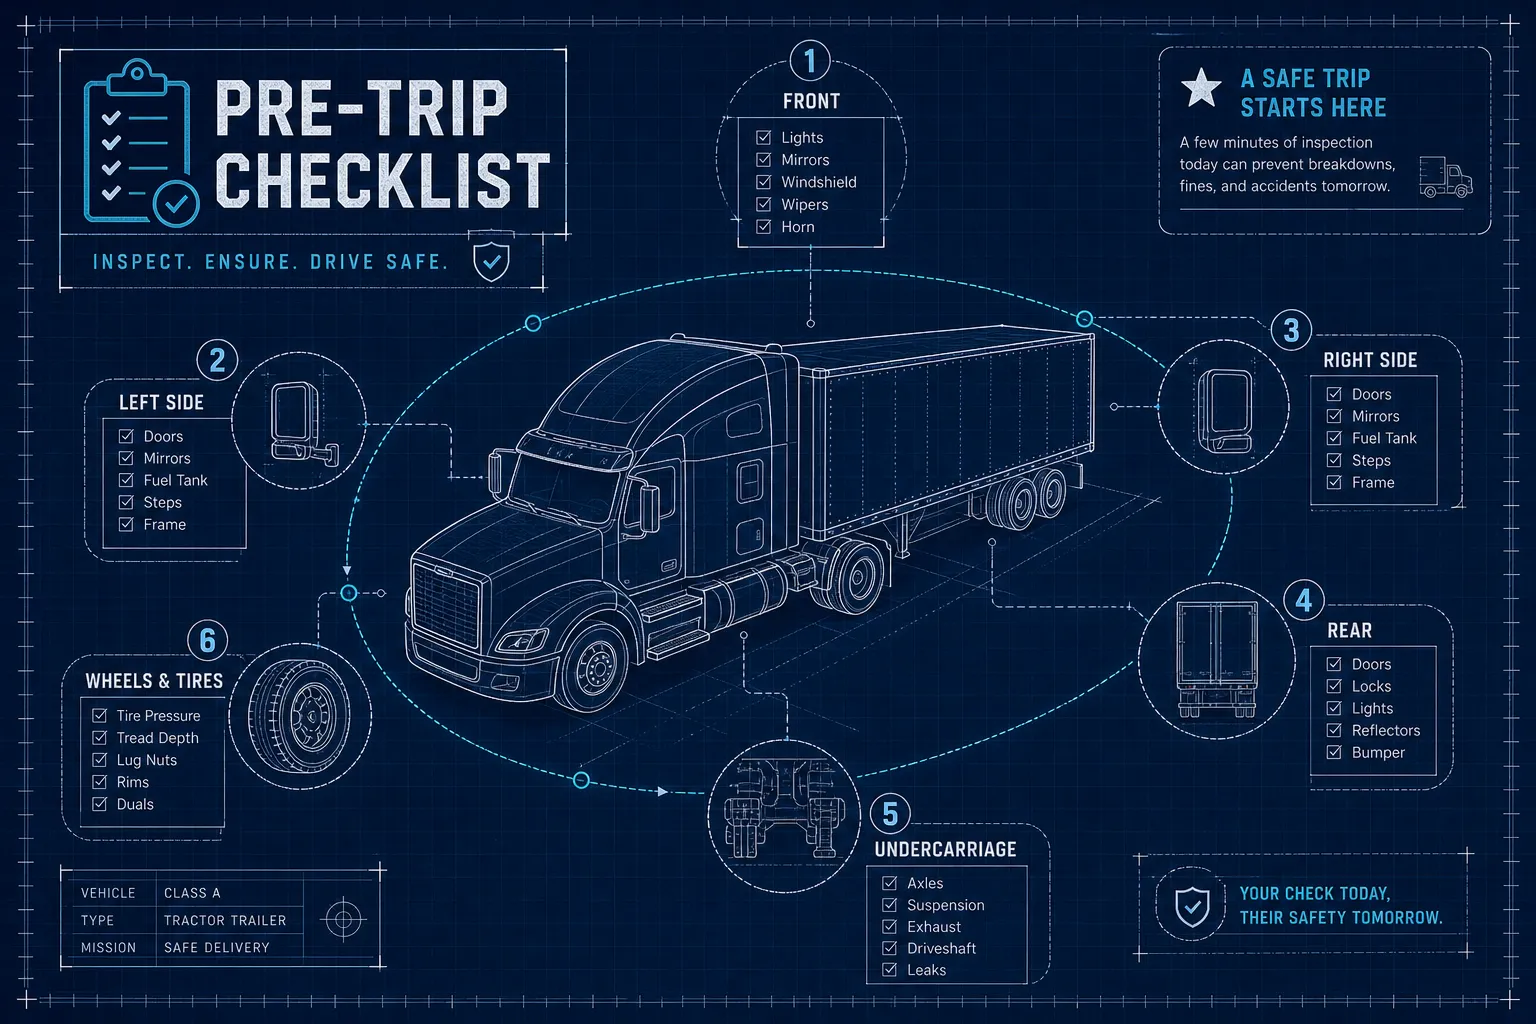
Your pre-trip checklist is the first safety decision you make on every shift, and one missed item is all it takes. A single inoperative clearance lamp, a brake chamber with too much pushrod travel, or a loose lug nut can get your vehicle placed out of service at a weigh station, trigger a CSA violation that stays on your record, or set the stage for a preventable accident before you've turned your first mile. The pre-trip inspection isn't a formality. It's what separates a compliant, road-ready rig from a liability waiting to happen.
This guide is a working, zone-organized CDL pre-trip checklist that covers every component a commercial driver is required to inspect, from the engine compartment to the trailer's rear doors. You'll move through each zone in the same sequence a DOT examiner and an experienced driver would follow: approach, engine compartment, cab and air brakes, tires and wheels, lights, coupling, cargo, and documentation. Every section delivers the specific checkpoints you need, not a summary of them.
This guide is built for new CDL candidates, ELDT students completing their theory training, and experienced drivers who want a tighter, more consistent routine. And if you're also preparing for the CDL skills test, CDLTest360's interactive PTI phrase trainer goes further than any printable pre-trip checklist by drilling the exact verbal wording examiners expect to hear at each inspection point. More on that at the end.
What federal regulations actually require you to inspect
Under 49 CFR § 392.7, every commercial motor vehicle driver must inspect the vehicle before driving and confirm that specific parts and accessories are in good working order. The federal vehicle inspection checklist covers eleven component categories: service brakes including trailer-brake connections, the parking brake, steering mechanism, lighting devices and reflectors, tires, horn, windshield wipers, rear-vision mirrors, coupling devices, wheels and rims, and emergency equipment. These categories represent the regulatory floor, not the ceiling. Carriers and state CDL testing standards routinely require inspections of additional items above that minimum.
Before you even begin your walk-around, federal rules require one more step: you must review the previous driver's inspection report and confirm that any noted defects were repaired or determined unnecessary. This is not optional, and "I didn't see the previous report" is not a compliant answer at a DOT audit. The chain of custody on vehicle defects starts with this acknowledgment.
When a written DVIR is actually required
Under 49 CFR § 396.11, a post-trip Driver Vehicle Inspection Report is only required when a defect affecting safe operation was discovered or reported during the day. A clean inspection does not require a written form under federal rules alone. That said, most carriers require a completed form regardless of findings, and some states impose their own documentation requirements, so check your company policy and state rules before assuming a clean trip means no paperwork.
Federal rules do not require a specific form layout, government-issued document, or inspection sequence. Carriers may use a printed checklist, an electronic DVIR, or a company-specific form as long as it captures all required items and any safety-related defects. This flexibility is deliberate; it allows you to use whatever format keeps your inspection consistent and your documentation compliant.
The pre-departure checklist sequence that prevents missed items
The most reliable way to avoid missed items is to follow the same physical route every single time. The recommended pre-departure checklist sequence moves in one direction: initial approach and paperwork review, engine compartment, cab and controls, driver-side walk-around, rear and coupling area, passenger-side walk-around, then air-brake and final lighting checks. Skipping around zones is how things get missed, and "I thought I checked that" holds zero weight on a roadside inspection report.
What to do before you ever walk the vehicle
Before you touch anything, review the previous DVIR and confirm noted defects were addressed. This step is a federal requirement, not a courtesy. Then scan the vehicle on approach: look for a leaning stance that suggests a flat tire, visible body damage, fluid puddles under the vehicle, and missing or broken lights. Confirm the parking brake is set and wheels are chocked if required before you open the hood or climb in the cab.
How to use this checklist as a physical tool
A pre-trip checklist only works if you physically engage with it rather than running through it in your head. Point to each item, touch it where safe to do so, and mark it as satisfactory or defective on paper or your electronic form before moving to the next item. Consistent physical engagement reduces the cognitive fatigue that causes misses during early-morning departures or back-to-back inspections at the end of a long day. If you find a defect mid-inspection, mark it immediately and continue through the remaining zones, stopping your sequence to deal with paperwork mid-walk is how other items get skipped.
Pre-Trip Checklist, Zone 1: Engine Compartment
With the engine off and the hood secured open, start at the fluid reservoirs. Check engine oil, coolant, power-steering fluid, and windshield-washer fluid: confirm each level is within the acceptable range and each reservoir cap is secure. Then look below the engine and around all hoses and fittings for fresh puddles or wet streaks. Fuel, oil, coolant, hydraulic fluid, and air leaks are all reportable defects under FMCSA guidance, not something to monitor until the next stop.
Belts, hoses, battery, and wiring
Inspect every belt for fraying, cracking, glazing, or improper tension. A belt that fails at highway speed can take out your steering, charging, and cooling systems simultaneously. Check hoses for bulges, cuts, soft spots, loose clamps, and heat discoloration. Move to the battery: confirm it's securely mounted, terminals are clean and free of corrosion, cables are intact, and there's no evidence of acid damage to surrounding components. Finally, scan the wiring harness near the engine and firewall for chafed insulation or conductors routed too close to moving parts.
Steering components and air compressor condition
With the hood open, inspect the steering box, drag link, pitman arm, and tie rods for looseness, cracks, or missing cotter pins. Severe wear or cracking on steering components such as the drag link can meet CVSA out-of-service criteria, consult FMCSA and CVSA guidance for the applicable thresholds, but don't treat visible damage as something to monitor on the road. Check the air compressor for secure mounting, intact oil supply lines, and no visible cracks in the housing. Close and latch the hood securely before moving to the cab.
Zone 2: Cab, controls, and air brake system
Before starting the engine, confirm the cab is secure on its mounts, the seat adjusts and locks properly, the seat belt is functional, and all required emergency equipment is present and accessible: fire extinguisher charged and mounted, reflective triangles in their case, and spare fuses if required by your vehicle class. Start the engine and immediately watch the gauges. Oil pressure should register within seconds, coolant temperature should begin climbing toward the normal range, and the charging system should show proper voltage. Warning lights should extinguish as systems confirm their status.
Visibility, mirrors, and cab safety equipment
Check the windshield for chips, cracks, or any obstruction in the driver's direct line of sight. Adjust both side mirrors and inspect them for cracked glass, loose mounts, or inadequate coverage of the required zones. Test the wipers and washer fluid, horn, heater, and defroster; these are federally required checks, not optional comfort features. Confirm steering-wheel free play is within the acceptable range for your vehicle class.
Air brake test sequence (step by step)
The air brake check has a specific order that can't be rearranged. Refer to your state CDL manual and vehicle manufacturer specifications for exact thresholds, as values can vary. The following steps reflect standard FMCSA-aligned procedures:
-
Build air pressure to the governor cut-out range, typically 120 to 140 psi.
-
Static leakage test: Engine off, brakes released, observe the gauge for one minute. Acceptable loss is no more than 2 psi for a single vehicle, 3 psi for a combination.
-
Applied leakage test: Press and hold the service brake pedal. Acceptable loss is 3 psi for a single vehicle, 4 psi for a combination.
-
Low-air warning test: Fan the brakes down by repeatedly applying and releasing the pedal. The warning device must activate before pressure drops below 60 psi.
-
Spring-brake test: Continue reducing pressure. Spring-brake protection valves must pop out and apply the spring brakes at approximately 20 to 45 psi, depending on the vehicle.
-
Parking brake test: Rebuild pressure, apply the parking brake, and attempt gentle forward movement in low gear to confirm it holds.
-
Service brake test: Release the parking brake, move forward at around 5 mph in a safe area, and confirm the brakes stop the vehicle cleanly without pulling to either side.
Pre-Trip Checklist: Tires, Wheels & Suspension
Check every tire with a calibrated pressure gauge. Visual checks alone can miss significant underinflation, which accelerates wear, increases heat buildup, and creates the conditions for a blowout, always use a gauge rather than relying on appearance. Measure tread depth: federal minimums under 49 CFR § 393.75 are 4/32 inch on steering axle tires and 2/32 inch on all other positions. Beyond depth, inspect every tire for cuts, bulges, exposed cords, flat spots, uneven wear patterns, and sidewall damage. A sidewall cut with exposed cord is an immediate out-of-service condition.
Wheel fasteners, rims, and hub seals
Check every lug nut for looseness or missing hardware. Rust streaks radiating outward from bolt holes often indicate that a nut has been moving before it becomes hand-detectable as loose; treat rust streaks as a defect, not a cosmetic issue. Inspect rims for cracks, bends, or any evidence of welded repairs. Look at hub seals carefully: significant grease or oil leaks at the hub that could affect safe operation may meet CVSA out-of-service criteria, consult current CVSA guidelines for the applicable standard. Dual tires must not touch each other, and nothing should be trapped between them. This is among the most commonly missed items on trailer axles.
Suspension, frame, and steering axle checks
Inspect leaf springs for cracks and airbag suspension components for proper inflation and no visible damage. Walk the full length of the frame looking for cracks, bent rails, missing fasteners, or unusual deformation. Check mud flaps for secure mounting and required coverage. A shifted axle seat or cracked leaf spring is not something to run on and report later; it goes on the defect list before departure.
Zone 4: Lights, coupling, cargo, and trailer
With all lights activated, walk the complete perimeter of the vehicle and verify every required lamp: low beams, high beams, turn signals, four-way flashers, brake lights, tail lights, license plate light, clearance and identification lights, and all trailer lamps. Inspect each fixture for cracked lenses, water intrusion, loose mounting, damaged wiring, and missing or peeling conspicuity reflective tape. A non-functioning clearance lamp is one of the most frequently cited roadside violations. Clean lenses and test every bulb rather than relying only on what's visible from the cab.
Fifth wheel and trailer coupling inspection
Confirm the fifth wheel is securely mounted to the frame with no cracked or loose mounting bolts. The skid plate should be properly greased and free of cracks. Pull back the release handle and visually confirm the locking jaws are fully closed around the kingpin with no gap between the trailer apron and the fifth-wheel skid plate. Check glad hands for correct connection: service line to service port, emergency line to emergency port. Confirm seals are intact and there are no audible air leaks. Verify the electrical cord is fully seated and free of cuts, the landing gear is fully raised and locked, and sliding tandem locks are engaged if applicable.
Cargo securement and trailer structure
Confirm the load is evenly distributed and does not push any axle over its weight rating. Inspect tie-downs, straps, chains, and load bars for correct tension, no damage, and adequate quantity per the commodity being hauled. Check that the load cannot shift, fall, or obscure any lights or reflectors. Walk the trailer frame and sidewalls looking for structural damage, then confirm rear doors, hinges, latches, and seals are fully closed and secured. Finish by scanning under the trailer for hanging components, dragging lines, or debris that could become a road hazard.
Pre-Trip Checklist: DVIR & Documentation
Every DVIR or pre-trip inspection form must capture a consistent set of identifying fields: carrier name, driver name and signature, date and time, vehicle unit number, trailer number if applicable, odometer reading, and inspection location. The form must include a certification statement confirming the vehicle was inspected in accordance with applicable federal regulations and that all defects affecting safe operation are listed. Completed DVIRs must be retained by the motor carrier for three months under 49 CFR § 396.11.
Describing defects precisely: the standard that holds up
Vague entries expose you and your carrier to liability during a DOT audit. "Lights checked" and "tire bad" are not compliant descriptions. Describe every defect by its specific location, component, and condition: "left rear trailer marker lamp inoperative" or "right steer tire sidewall cut with exposed cord." When defects are significant, photograph them: one wide shot showing vehicle context, one close-up showing the defect detail, both with timestamps and the unit number visible in frame.
What happens after you report a defect
Any defect affecting safe operation must be reported to maintenance or dispatch immediately; the vehicle cannot move until that defect is corrected. The mechanic or authorized official certifies the repair in writing, and the next driver must review the prior DVIR and sign acknowledgment before departure. This chain of custody, inspection, defect report, repair certification, and driver acknowledgment, is exactly what a DOT auditor looks for during a compliance review. A gap anywhere in that chain becomes a recordable violation.
Beyond the printable checklist: mastering your PTI wording
Knowing what to look for and being able to verbalize it correctly during a CDL skills test are two entirely different skills. Examiners score candidates on whether they name the correct components, use the right terminology, and deliver inspection commentary in a clear, sequenced format. A printed pre-trip checklist shows you the items. It cannot simulate the pressure of saying them out loud, in order, while an examiner marks a score sheet.
How CDLTest360's PTI phrase trainer fills that gap
CDLTest360's interactive PTI phrase trainer prompts you to recall the exact inspection wording for each vehicle component in the correct order, simulating what an examiner actually listens for. Instead of reading a static list, you're actively practicing the verbal script, which is what builds real confidence before test day. The missed-question review system isolates only the components where you struggled and re-drills them until the response is automatic rather than effortful.
The PTI phrase trainer is available through CDLTest360's subscription plans, and there's a no-account-required free trial so you can test it immediately without signing up. If you're a CDL school or instructor, the school dashboard lets you assign PTI practice to individual students and track their progress across every inspection zone.
Put the checklist to work starting today
A complete pre-trip inspection isn't paperwork. It's the first safety decision a driver makes on every shift, and it's the one that determines whether everything that follows is built on a reliable foundation or a known risk. The zone-based sequence covered here, approach and documentation review, engine compartment, cab and air brakes, tires and wheels, lights, coupling, cargo, and DVIR completion, gives you a repeatable process that holds up at weigh stations, DOT audits, and CDL skills tests alike.
Download or print this pre trip checklist and use it on every inspection until the sequence is muscle memory. Physical checklists reduce the cognitive load during early-morning or back-to-back runs when mental fatigue is highest. Once the routine is set, you'll move through it faster and more accurately than any shortcut approach.
If you're working toward your CDL, this printable pre-trip checklist gives you the what. CDLTest360's PTI phrase trainer gives you the how to say it when it counts. Drivers who pass on the first attempt have practiced the verbal script, not just read the checklist. That gap is exactly what the PTI phrase trainer is built to close. Start your free trial at CDLTest360 and find out exactly where your preparation stands before you walk into that exam.
{ "@type": "Article", "datePublished": "2026-10-14T11:02:14.350Z", "dateModified": "2026-10-14T11:02:14.350Z", "headline": "CDL Pre-Trip Checklist: A Complete Zone-by-Zone Guide", "description": "Use this CDL pre-trip checklist to inspect every vehicle zone, document defects on your DVIR, and stay road-ready. Free printable breakdown inside.", "publisher": { "@type": "Organization", "name": "CDLTest360" }, "image": [ "https://composeo-article-images.s3.us-east-1.amazonaws.com/cdl-pre-trip-checklist-a-complete-zone-by-zone-guide-1791893285580.webp" ] }